Good afternoon! I hope you are all having a great week so far. This one is flying right by for me!
I’m coming to you on a break at the gym, but I couldn’t let the day go by without checking back in and sharing the workout I talked up earlier this morning. I know you are all on the edge of your seats waiting for advice on what to do at the gym after work tonight. Haha! (I’m kidding, but hey, you never know…)
Before I start rambling, let’s dive right into the content. Below is a total body strength training workout that also happens to focus on the shoulders. I felt that was worth mentioning because I like to split my “push” exercises into shoulder days and chest days. This was a shoulder day.
I just figured I would throw that in there, in case anyone randomly noticed an absence of chest exercises from a workout that claims to be “total body”. If you’d rather add in a chest and drop one of the shoulder exercises, substitute dumbbell chest presses for the shoulder presses. Boom.
There are three different circuits within the workout, and then entire thing took me about 40 minutes to complete!


I utilized a variety of equipment most gyms will have including a stability ball, free weights, TRX, and a cable machine. If you don’t have access to a TRX, don’t worry. I’ve provided substitutions for you!
Also, if you’re up for it and have it available, try throwing in an ab mat or stability ball for the sit-ups to increase your range of motion and make the exercise even more challenging.
If you decide to give this workout a try, please take a look and listen to the cues on technique and form. Enjoy!
Exercise Breakdown
While I usually feature original photos in my exercise descriptions, this workout showcases a collection of awesome (sourced) photos from . They’ve covered close to every workout move in the book!
• sit-ups
Get on the floor in a sit-up position: back and feet flat on the floor with your knees bent to a ninety degree angle. Cross your arms over your chest. This is your starting position. Tighten your glutes and hamstrings as you sit up, then slowly roll back to the starting position.
Repeat for 15 reps.
• plank hold (or stability ball plank hold)
Get into a plank position on your elbows and toes.
Make sure your hips are in line with your shoulders, your elbows are under your shoulders, your legs are straight, and your core is tight. Hold this position tight anywhere from :30 to 1 minute without letting your back round or arch. You can always drop your knees to modify.
If you feel comfortable holding a straight leg plank hold, grab a stability ball and go for a :30 – :60 unstable plank hold balance!
For this version, your feet are about three feet apart. Place your palms on the ball and walk out until your back is straight and hips are in line with your ankles. Leaning your body forward, come down to your forearms and keep your elbows under your shoulders. Keep your core tight and balance here as long as a minute. If you start to compromise your form, come down.
• side-lying hip abductions
(you can also try stability ball hip abductions)
Start by lying on your left side with your hips and shoulders squared off to the front. Place your right hand on your hip or in front of you holding your balance on the mat. Keep your bottom leg bent and on the floor while your top leg extends and straightens. This is your starting position.
Keeping your top leg straight, and foot flexed, make sure your ankle is in line with your hips and contract your glute to lift the leg. Hold the position for 1-2 seconds and return to your starting position. Avoid throwing your leg up and down, and concentrate on a slow and controlled movement engaged by your outer glutes. Complete 10 reps, then switch sides.
You can progress the movement by lifting the body off of the floor and then eventually get to a !

Complete 10 reps per side. That will feel like plenty!
• stability ball bent leg bridges
First, let’s begin with a bent leg bridge on the floor.
Start by lying on your back with your legs bent and feet flat on the floor. They should be about hip-width apart. Arms should be resting by your sides with the palms facing the ceiling. Squeeze your glutes to lift your hips and hold the position for about 2-3 seconds. Stay on the heels of your feet and keep squeezing your glutes. Slowly lower your hips without touching the floor and repeat.
If you feel comfortable doing this, try performing a bridge on a BOSU or stability ball!

Your back will start on the mat and feet will be on the ball.

Choose whatever version you can complete for 15 reps.
• standing dumbbell shoulder presses
Start standing with your feet hip width apart, holding a medium dumbbell in each hand with your palms facing forward. Bend your elbows and bring the weights to your shoulders (just like a biceps curl). Keeping your core tight, straighten your arms overhead and rotate your palms to face out. Bend the elbows to return back to the top of the biceps curl position.
In this version, there is no need to actually perform a curl. Simply press from the shoulders to straighten and back for each rep.
• dumbbell lateral raises
Start standing with your feet hip width apart, holding a light dumbbell in each hand with your palms facing your body. Slowly raise your hands up toward the ceiling. Keep your palms facing down, your elbows straight, and just go high enough to get your arms parallel to the floor (shoulder height).

Slowly bring your hands back down towards your body. Complete for 10 to 12 reps.
• cable pulldowns
See this video for a great description and cues. You can choose to do a close or wide grip.

Test out the weight so that it is not too easy or too hard. A standard rule I tell my clients is if you get to the max rep (12) and feel like you could probably do a few more, bump up. You might want to start lighter and increase the weight with each set.
• TRX rows (or dumbbell bent over rows)
The TRX body row is one of my absolute favorite exercises to compete myself or include in workouts for others!
If you don’t have access to one, grab a pair of medium – heavy dumbbells and do rows instead.
Start with your feet hip width apart, holding dumbbells in front of you and sit back in your hips. Bend over at a 45 degree angle and make sure to keep your back neutral (not arched or rounded) with your core engaged. Keep your chest up, your shoulders pressed down, and your chin lifted.

With your palms facing your body, engage your abs and squeeze your shoulder blades together as you bring the weights towards your torso. Keep your elbows pointed upward! Slowly lower the weights back to the starting position to complete one rep.
• standing dumbbell biceps curls
Grab a set medium set of dumbbells and start in a standing position with your feet shoulder width apart. Rotate your palms to the front (holding a dumbbell on each side) and engage the core to keep your body exactly where it is. Keeping your shoulders down, squeeze the dumbbells up to your shoulders and then slowly lower them back down.

Keep the elbows locked into your sides!
• dumbbell triceps kickbacks
(You can also choose to do one arm at a time and use a bench for support, if you’d like.)
Start with a dumbbell in each hand and your feet planted under your hips. Keep your back straight with a slight bend in the knees and bend forward at the waist so your torso is almost parallel to the floor. Keep your head up!
Pull your arms tight to your sides and also parallel to the floor. Keep a 90-degree angle between your forearm and upper arm throughout the duration of the exercise. Use your triceps to lift the weights until the arm is fully extended, briefly pause, then return to the starting position.
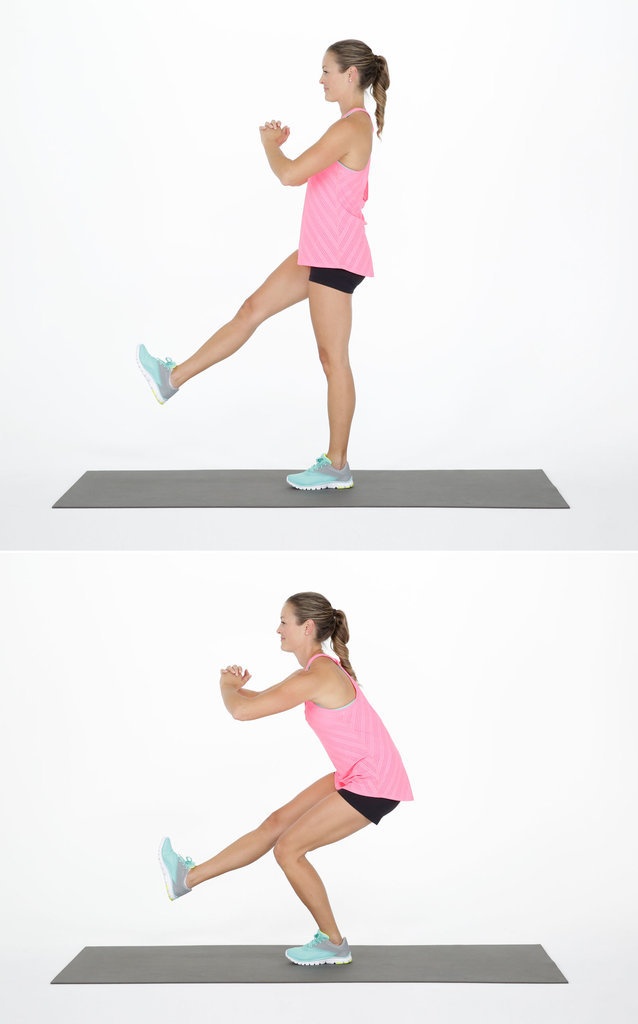
• dumbbell split squats
Start standing tall with your feet hip width apart holding medium – heavy weights by your sides or curled up by your shoulders. Step backward with your right leg, and lower your body until your left knee is bent at least 90 degrees and your right knee nearly touches the floor. This is a reverse lunge position.

Keeping your chest lifted, perform ten controlled split squats, then switch legs.
• single leg squats
Start with your feet hip-width apart and pointing forward. Begin with your back tall, right leg slightly bent, and hands on your hips. Be careful not to arch your lower back here! With your core tight, keep your legs exactly where they are (left leg is hovering the floor) and lower into a squat position. Think about mimicking the movement of sitting in a chair.
Your left leg stays bent throughout the set and your right leg bends and straightens. Make sure your knees are in line with your feet, and focus on keeping both your knees and feet neutral and pointed forward.
Complete 10 reps, then switch sides.
Happy Sweating!
Disclaimer: Although I am a certified personal trainer, I am not necessarily your personal trainer. The workouts I post are what work best for me and might not be the right type of exercises for you. If you decide to give this workout a try, please listen to your body and rest or modify as you see fit. I always recommend consulting a doctor or health professional before making changes to your diet or fitness routine.

Hi! I’ve been reading your blog for a while now, and just want to say this circuit seems PERFECT for my apartment building’s little fitness center; thank you so much for sharing!!!
Hi Kara, thanks for reading! I hope you enjoy the workout 🙂
Great workout! I love finding good gym workouts as I often head there with a million ideas in mind on what I’d like to do then forget once I’m there and wander around. I have to have a plan written down or a workout pinned I can look at on my phone. This one’s great!
Haha, I’m the same way. Now I try to at least go in with some idea of what I want to do! Otherwise I just bounce around and randomly do exercises. Not very effective. 😉